Alarm-System the size of a USB stick


Today I would like to show you how to build an alarm system with the size of a USB stick. There are a lot of advantages to this. It's so small it can be placed everywhere in a house. The components we use are cheap so it is possible to place a system in each room. The system is not only cheap and tiny but also not very power hungry. Hence, we can power it from a small battery or a USB charger.
The alarm system has a motion detector and will send an alarm by email if an intruder is detected. It is easily possible to extend the system to send SMS notifications or support also temperature, smoke, or photoelectric sensors.
In my last blog post, I made a review of the Espruino Pico. It's a small microcontroller with a USB port. The Pico is a perfect match for such an alarm system we are planning to build.
Hardware
To start we need the following components:
Unfortunately, there will be network connection problems when you use the WiFi module on a breadboard. Because of that I recommend you, to solder the WiFi module together with a Shim onto the Pico as explained in this video. More about it can be found in the Pico documentation.
The next step is, to connect the PIR motion sensor to the Pico. I just used some simple wires without any breadboard as shown in the picture. A deluxe version would be to tape both components together to a compact unit or to build a nice case with a 3D printer.
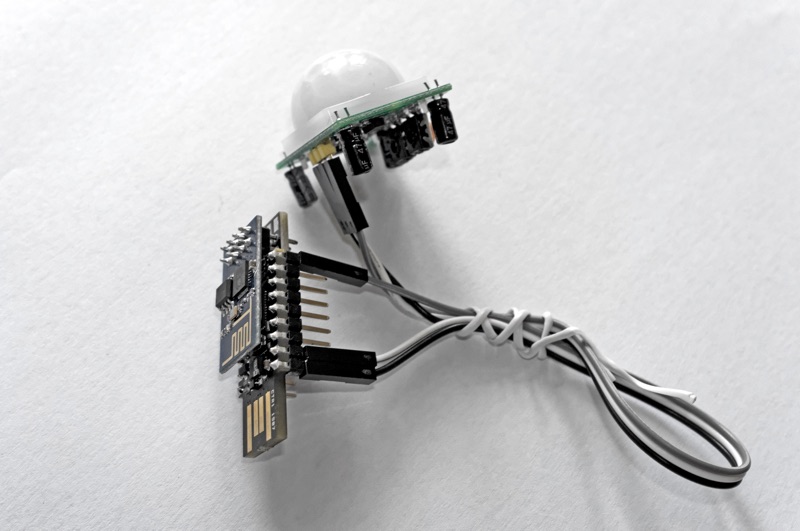
Connect the pins of the PIR motion sensor to the Pico as follow:
- VCC => VBAT (5v)
- OUT => A8
- GND => GND
The PIR motion sensor has two potentiometer to configure the sensors settings:
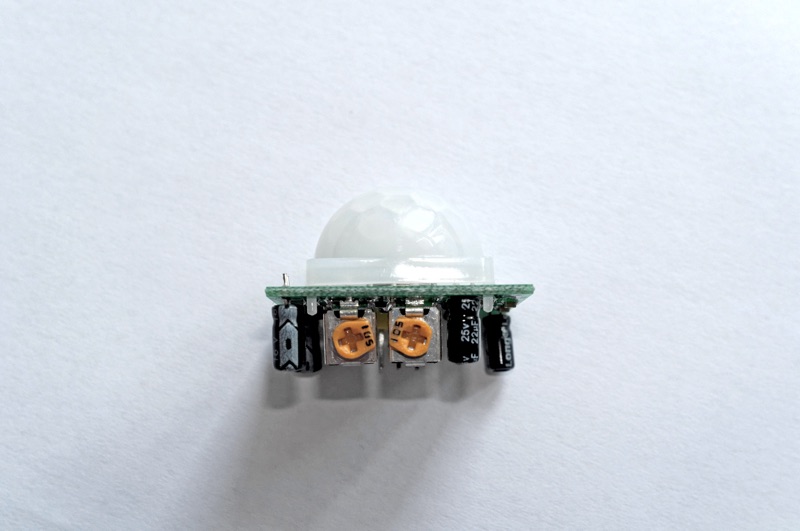
The left one controls how long the detection signal is triggered (set to 1). This is useful if you want to switch on a lamp and would like to let the lamp burning for a couple of minutes (even if the movement stopped). In our case, we set it to the minimal possible time (5s) as shown in the picture. This will trigger as many movements as possible.
The potentiometer on the right side sets the detection distance. I recommend playing around with it until you found the right setting.
Software
The software part of the alarm system does the following:
- Connect to the WIFI network
- Detect a movement
- Enable a LED as long as there is movement
- Send an email when there is movement. The email should get send once and not every time a movement is detected. While this could be controlled with the potentiometer of the PIR sensor we would like to do it in software.
To send the alarm email, I use Mandrill. There are also many other services like Twillio to send texts or we could publish an alert on Twitter.
The good thing with Mandrill is, that the first 10'000 emails are for free (each month) and they offer an email template system. With the email template system, it is possible to design the email without changing the code on the Pico. Instead, we will send only the dynamic fields to Mandrill. It's easier and saves bandwidth.
Before we start coding our Pico software I recommend to make a new Mandrill account and add a new email template. To do this, click "Outbound" => "Templates" => "Create Template" in the Mandrill dashboard. Then fill the fields as shown in the screenshot and change the content as you please.

Email HTML text:
<img src="http://files.softicons.com/download/transport-icons/standard-road-icons-by-aha-soft/png/256x256/alert%20on.png" width="128" height="128"/><h1>Intruder Detected</h1>
<table>
    <tr>
        <td>Time</td>
        <td mc:edit="alertTime"></td>
    </tr>
    <tr>
        <td>Place</td>
        <td mc:edit="alertPlace"></td>
    </tr>
</table>
<p>
    Send from:<br/>
	    Espruino Pico
</p>
Click "Publish" when you are done designing the email template.
The next step is, to create a Mandril API key which we use in the Pico code in order to call the API. You can create a new key with: "Settings" => "SMTP & API Info" => "Create New API Key".
Ok. Let's start with coding the Pico. Open the Espruino WebIDE and create a new file. First we declare our configuration variables. Replace the placeholder for the email address, WiFi and Mandrill API key with real values. If you have set-up your own custom domain in Mandrill then you can also change the from email address.
The alert cool down time specifies how often an alert is triggered when a movement is detected. A good testing value is 60 seconds.
var ALERT_COOLDOWN = 60 * 1000;
var WIFI_SSID = "<WIFI_SSID>";
var WIFI_PW = "<WIFI_PW>";
var MANDRILL_KEY = "<MANDRIL_API_KEY>";
var FROM_EMAIL = "<FROM EMAIL>";
var TO_EMAIL = "<YOUR EMAIL>";
var ALERT_PLACE = "Livingroom";
The first helper function builds the email content. The minimal required parameters by the Mandrill API are API key, template name, template variables, and form/to addresses. For the variables, we use the current time of the alert and the "place" of the alert which is taken from ALERT_PLACE.
function buildEmailContent(currentTime) {
  var content = JSON.stringify({
    "key": MANDRILL_KEY,
    "template_name": "intruder-alert",
    "template_content": [
      {
        "name": "alertTime",
        "content": currentTime.toString()
      },
      {
        "name": "alertPlace",
        "content": ALERT_PLACE
      }
    ],
    "message": {
      "from_email": FROM_EMAIL,
      "to": [
        {
          "email": TO_EMAIL,
          "type": "to"
        }
      ]
    }
  });

  return content;
}
The next function is sending the email. Since this is a prototype we will make the Mandrill API call directly from the Pico. In a productive application, it is better to make the call from a separated backend system so that the Mandrill API keys are not exposed to the users of the Pico. A backend system could also make sure the Pico is authenticated and authorized to send the alert email.
Unfortunately, the Espruino Pico does not support HTTPS calls which is a problem for productive apps. A possible workaround would be to use the SSL features of the new ESP8266 firmware. This firmware is not yet supported by the Pico, but I'm also not sure how stable those new SSL features are.
function sendEmail(content) {
  var options = {
    host: 'mandrillapp.com',
    port: '80',
    path:'/api/1.0/messages/send-template.json',
    method:'POST',
    headers: {
      "Content-Type": "application/json",
      "Content-Length": content.length
    }
  };

  var req = require("http").request(options, function(res)  {
    console.log("***> HTTP response code: " + res.statusCode);

    var responseData = "";
    res.on('data', function(data) {
      responseData += data;
    });

    res.on('close', function(data) {
      console.log("***> HTTP response: " + responseData);
      console.log("***> HTTP connection closed");
    });
  });

  req.end(content);
}
To LEDs are controlled by the following helper functions. setInterval is used to flash the built-in LEDS of the Pico. The LEDS flash on the following actions:
- WiFi error (red flash until resolved)
- When the surveillance is started (green flash for 2s)
- As long as there is a movement (constant green light)
- When an alert is triggered (red flash for 1.2s)
function flashErrorLED() {
  setInterval("digitalWrite(LED1,l=!l);", 200);
}

function enableMovementDetectedLED() {
  digitalWrite(LED2, 1);
}

function disableMovementDetectedLED() {
  digitalWrite(LED2, 0);
}

function flashSurveillanceStartedLED() {
  var intervalId = setInterval("digitalWrite(LED2,l=!l);", 200);
  setTimeout(function() {
    clearInterval(intervalId);
    digitalWrite(LED2, 0);
  }, 2000);
}

function flashAlertSentLED() {
  var intervalId = setInterval("digitalWrite(LED1,l=!l);", 200);
  setTimeout(function() {
    clearInterval(intervalId);
    digitalWrite(LED1, 0);
  }, 1200);
}
On each alert, an email is sent and the red LED flashes for 1.2s. The alert function has a cool down period so that not each movement (which could be every 5s) triggers a new alert.
var lastAlertTimestamp;
function triggerAlert() {
  var currentTimestamp = Date.now();

  if (lastAlertTimestamp === undefined ||
      lastAlertTimestamp + ALERT_COOLDOWN < currentTimestamp) {
    lastAlertTimestamp = currentTimestamp;

    var currentTime = new Date();
    var content = buildEmailContent(currentTime);
    sendEmail(content);
    console.log("Alert sent: " + currentTime.toString());
    flashAlertSentLED();
  }
}
Them main function starts the surveillance. Both watchers listen to the PIR motion sensor signal. When the signal is rising (set to 1) then a movement has been detected. When the signal is falling (set to 0) then the movement has stopped.
function startSurveillance() {
  console.log("Start surveillance...");
  flashSurveillanceStartedLED();

  setWatch(function() {
    enableMovementDetectedLED();
    triggerAlert();
  }, A8, {repeat:true, edge:"rising"});

  setWatch(function() {
    disableMovementDetectedLED();
  }, A8, {repeat:true, edge:"falling"});
}
The first action of the alarm system is to connect to the WiFi. If this is not possible for some reason (e.g. PW incorrect) then a red flash will indicate that the system is not ready. The surveillance is started as soon as the WiFi has established the connection.
Hint: If you connected the WiFi module to the Serial1 port of the Pico then change both Serial2 occurrences before running the code.
try {
  Serial2.setup(9600, { rx: A3, tx : A2 });

  console.log("Init wifi module...");
  var wifi = require("ESP8266WiFi").connect(Serial2, function(err) {
    if (err) throw err;

    wifi.getVersion(function(err, version) {
      console.log("WiFi chip version: " + version);
    });

    wifi.reset(function(err) {
      if (err) throw err;

      console.log("Connecting to wifi network: " + WIFI_SSID);
      wifi.connect(WIFI_SSID, WIFI_PW, function(err) {
        if (err) throw err;

        console.log("Connected");
        startSurveillance();
      });
    });
  });
} catch(err) {
  flashErrorLED();
  console.log(err);
}
Click "Send to Espruino" to run the code. Walk in front of the PIR motion sensor. You should receive an email:
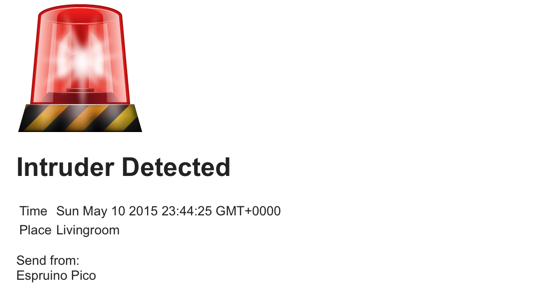
I had a lot of fun creating the alarm system. I hope you had some fun too! Let me know if you made some improvements in your own alarm system.
The complete Pico code can be found in the GitHub repo Schweigi/espruino-examples.