A tiny nifty data logger


In this week's blog post, I would like to show you how to make a data logger. Data loggers are fun to built and the logged data is useful to gain insights. For example to check the humidity in your apartment or to see the temperature profile.
Hardware
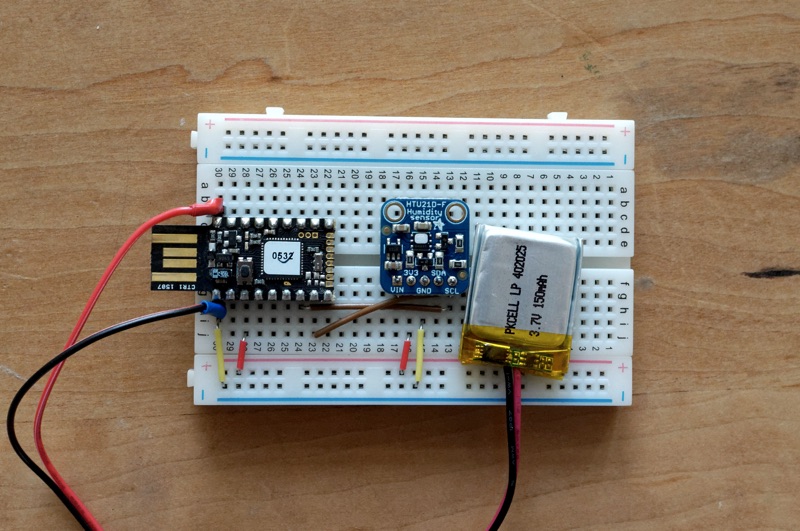
As usual I will use the Espruino Pico for the data logger. For the temperature and humidity sensor, I'm using the HTU21D-F breakout board. You can buy it on Adafruit or any other electronic store.
Connect the HTU21D with the Pico as follow:
- GND => GND
- VCC => 3.3
- SCL => B6
- SDA => B7
A data logger should be mobile. Therefore, I'm running the Pico form a battery. I'm using a tiny 3.7V (150mAh) LiPo battery which I got from Adafruit. You can use any kind of battery which has an output between 3.5V - 16V. Connect the battery to the BAT_IN (+) and GND (-) ports.
After you connected all the components, your data logger should look like the one in my picture:
Software
The data logger has all the necessary functionality you would expect:
- Log temperature
- Log humidity
- Log date/time of each record
- Green flashing LED shows when a new record has been stored
- Green LED shows if logger is full
- Red LED shows if the battery is empty
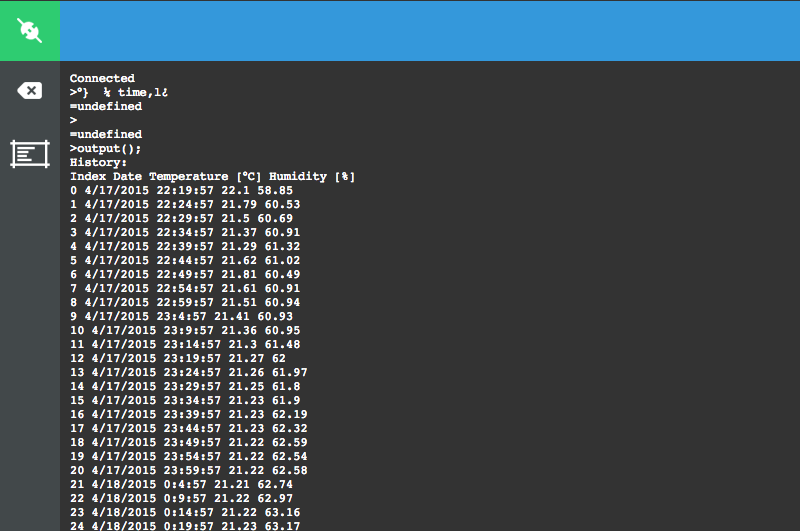
- Possibility to output all records to a terminal
To simplify things, all records are stored in memory. So you need to make sure to never disconnect the power source, otherwise all records will be lost.
Another side note is that the Espruino has no internal clock. Once you disconnect it from power not only will you lose all data but also the time will be reset to zero.
I leave it as an enhancement to you, to add an SD card or use the built-in flash memory for permanent data storage. Additionally you can add an external clock to make the logger independent from power outages.
All logged records are stored in Int16Array's. We have one array for the temperature and another one for the humidity. Int arrays are used to save memory space because Float arrays would use much more space. Therefore, before a value is stored it's multiplied by 100 to preserve the last two digits. If you are not interested in those then I would recommend using Int8Array's. With Int8Array's you would be able to record twice the amount of data.
You can store around 9'000-10'000 records (2 x 18-20KB) before reaching the memory limit of the Pico. To be on the safe side, I'm recommending to use a lower limit like 6'500. Otherwise, it can happen that the Pico is running out of memory while recording. Thus, you can record a little bit more than three weeks with a 5min interval.
The code is mostly self-explanatory. The first thing is to connect to the sensor with require('HTU21D').connect(I2C1). After that the temperature and humidity are logged every X milliseconds (specified by INTERVAL_MS).
The last function output() is used to write all records to the terminal. This function uses the history timestamp to re-build the timestamp of each record. This saves a lot of memory compared to storing a timestamp for each individual record. Since the Date object used by the Pico uses UTC you need to adjust TIMEZONE_OFFSET_H to get the timestamps printed in your local time zone.
I2C1.setup({sda:B7, scl:B6});

var MAX_ENTRIES = 6500;
var MIN_BATV = 3.2;
var INTERVAL_S = 5 * 60;
var TIMEZONE_OFFSET_H = -7; // OFFSET FROM UTC

var historyIndex = 0;
var historyTimestamp;
var historyTemp = new Int16Array(MAX_ENTRIES);
var historyHum = new Int16Array(MAX_ENTRIES);
var htu = require('HTU21D').connect(I2C1);

function flashGreenLED() {
  digitalWrite(LED2, 1);
  setTimeout(function() {
    digitalWrite(LED2, 0);
  }, 1000);
}

function getBatteryLevel() {
  return E.getAnalogVRef();
}

function checkBatteryLevel(v) {
  if (v < MIN_BATV) {
    digitalWrite(LED1, 1);
    return false;
  } else {
    return true;
  }
}

function checkHistoryLimit() {
  if (historyIndex >= MAX_ENTRIES) {
    digitalWrite(LED1, 1);
    return false;
  } else {
    return true;
  }
}

function log() {
  var batV = getBatteryLevel();
  if (!checkBatteryLevel(batV)) {
    return;
  }

  if (!checkHistoryLimit()) {
    return;
  }

  flashGreenLED();
  historyIndex++;

  // Set history timestamp after first measurement
  if (historyTimestamp === undefined) {
    historyTimestamp = Date.now();
  }

  htu.getHumidity(function (x) {
    historyHum[historyIndex-1] = x * 100;
  });

  // Stagger the temperature reading by one second, to prevent a read collision
  setTimeout(function () {
    htu.getTemperature(function (t) {
      historyTemp[historyIndex-1] = t * 100;
    });
  }, 1000);
}

function generateDateString(i) {
  var d = new Date(historyTimestamp + i*INTERVAL_S*1000 + TIMEZONE_OFFSET_H*3600*1000);
  return (d.getMonth()+1)+"/"+d.getDate()+"/"+d.getFullYear()+" "+d.getHours()+":"+d.getMinutes()+":"+d.getSeconds();
}

function output() {
  console.log("History:");
  console.log("Index\tDate\tTemperature [°C]\tHumidity [%]");
  for(var i=0; i<historyIndex; i++) {
    var date = generateDateString(i);
    var temp = historyTemp[i]/100;
    var hum = historyHum[i]/100;

    console.log(i + "\t" + date + "\t" + temp + "\t" + hum);
  }
}

setInterval(log, INTERVAL_S*1000);
The awesome thing about the Pico is that everything is event-driven. If there is no code to run then the Pico switches to sleep mode. The Pico consumes around 11-12mA in sleep mode. This means it's possible to run the data logger for several hours with my tiny 150mAh battery.
In order to see if the Pico switch into the sleep mode you can add the following code setSleepIndicator(LED1); to the end of the source. This code will activate the red LED when the Pico is NOT sleeping.
Btw. The Pico goes never into sleep mode when attached to the USB port.
The Pico also has a deep sleep mode. In deep sleep mode, only 0.6mA is used. It has been announced that an upcoming firmware update will lower this number to 0.01mA! To put the Pico into deep sleep mode add the following code to the end: setDeepSleep(1);
Attention: When the Pico is in deep sleep mode it needs to be awaken either by an external interrupt (setWatch) or timer (setInterval, setTimeout). Otherwise, you can't program it anymore as it doesn't awake by itself when attached to a USB port. Therefore, I also recommend adding a small function to wake the Pico up when pressing the built-in button.
The complete sleep code:
setWatch(flashGreenLED, BTN, true);
setSleepIndicator(LED1);
setDeepSleep(1);
Usage
Let's use the data logger. Connect the battery first and then run the WebIDE to copy the program onto the Pico. After the program is running you can disconnect the USB cable. The Pico should run on battery power now.
Leave it running for at least a day.
After that connect the USB cable but leave the battery connected too. If the Pico is in deep sleep mode you need to wake it up by pressing the built-in button first.
Then type output(); into the WebIDE terminal. This will print all records to the console.
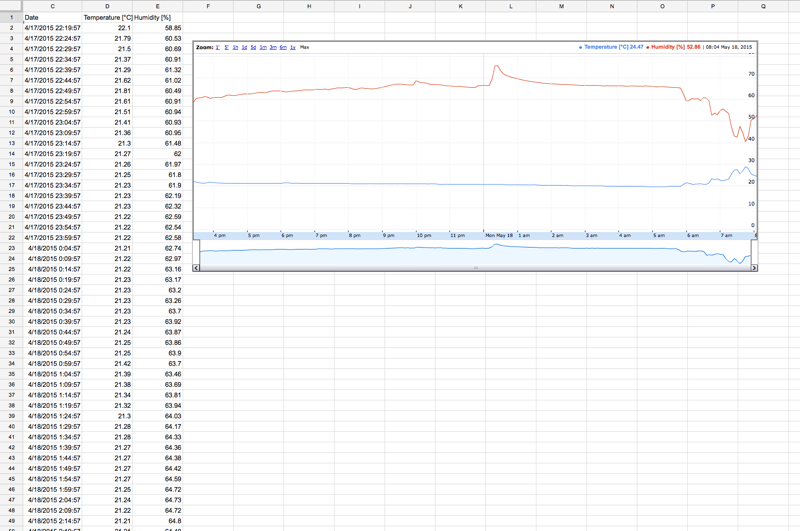
Copy the records to Google Sheets or Microsoft Excel. In Google Sheets, you can then select the Date, Temperature, and Humidity columns and then click Insert Chart. This will generate a nice chart of the temperature and humidity profile.
Conclusion
With the Espruino platform, it is extremely simple to build small gadgets. With the event-driven approach, it's possible to put the Pico into deep sleep mode with no additional coding. I'm currently running the data logger for days with a 150mAh battery.
I published the complete Pico code in my Github repo Schweigi/espruino-examples.
The current implementation provides a lot of room for enhancements. Let me know what you build!